Blocking Nintendo servers
This page will help you set up a method to block all communication with Nintendo. This will stop any updates and reporting to Nintendo, but it will prevent use of the eShop and online games.
Instructions for DNS.MITM
You can configure Atmosphère to automatically redirect any requests directed to Nintendo to nothing instead. Documentation about this feature can be found here. The section below will help you set up DNS redirection on your emuMMC. Note that this will only apply when you are using your emuMMC (unless applied on sysCFW).
Section I - Requirements
- The emummc.txt file
- Atmosphère 0.18.0 or higher
Section II - Installation
- Enter RCM and inject the hekate payload.
- If you use a modchipped Switch, you can simply just turn your Switch on with the hekate payload renamed to
payload.binon the root of your SD.
- If you use a modchipped Switch, you can simply just turn your Switch on with the hekate payload renamed to
- Navigate to
Tools>USB Tools>SD Cardand plug your Switch into your PC via USB. - Enter the
atmospherefolder. - If it doesn't exist already, create a folder named
hostsin theatmospherefolder.- You should end up with the
sd:/atmosphere/hostsdirectory.
- You should end up with the
- Copy the
emummc.txtfile into the hosts folder.- If you want to apply the DNS redirection to sysMMC instead of emuMMC, rename the file to
sysmmc.txt.
- If you want to apply the DNS redirection to sysMMC instead of emuMMC, rename the file to
- Eject the
UMSdevice safely from within your computer's operating system and boot into CFW.
Verifying functionality
You can verify the functionality of the DNS redirection by booting into emuMMC (or sysCFW, if you applied the config to sysCFW), and powering off afterwards.
A report will be generated in sd:/atmosphere/logs called dns_mitm_startup.log. If this file contains the following text, the DNS redirection is active.
DNS Mitm:
Adding defaults to redirection list.
Selecting hosts file...
Skipping /hosts/emummc_<emummc_id>.txt because it does not exist...
Selected /hosts/emummc.txt
Redirections:
    `*ctest.cdn.nintendo.net` -> 157.230.80.146
    `*conntest.nintendowifi.net` -> 157.230.80.146
    `*nintendoswitch.cn` -> 127.0.0.1
    `*nintendoswitch.com.cn` -> 127.0.0.1
    `*nintendoswitch.com` -> 127.0.0.1
    `*nintendo.pl` -> 127.0.0.1
    `*nintendo.ch` -> 127.0.0.1
    `*nintendo.se` -> 127.0.0.1
    `*nintendo.co.za` -> 127.0.0.1
    `*nintendo.ru` -> 127.0.0.1
    `*nintendo.pt` -> 127.0.0.1
    `*nintendo.no` -> 127.0.0.1
    `*nintendo.nl` -> 127.0.0.1
    `*nintendo.it` -> 127.0.0.1
    `*nintendo.hu` -> 127.0.0.1
    `*nintendo.gr` -> 127.0.0.1
    `*nintendo.fr` -> 127.0.0.1
    `*nintendo.fi` -> 127.0.0.1
    `*nintendo.de` -> 127.0.0.1
    `*nintendo.dk` -> 127.0.0.1
    `*nintendods.cz` -> 127.0.0.1
    `*nintendo.be` -> 127.0.0.1
    `*nintendo.at` -> 127.0.0.1
    `*nintendo.co.nz` -> 127.0.0.1
    `*nintendo.com.au` -> 127.0.0.1
    `*nintendo.com.hk` -> 127.0.0.1
    `*nintendo.tw` -> 127.0.0.1
    `*nintendo.co.kr` -> 127.0.0.1
    `*nintendo.es` -> 127.0.0.1
    `*nintendowifi.net` -> 127.0.0.1
    `*nintendo-europe.com` -> 127.0.0.1
    `*nintendo.co.uk` -> 127.0.0.1
    `*nintendo.co.jp` -> 127.0.0.1
    `*nintendo.jp` -> 127.0.0.1
    `*nintendo.net` -> 127.0.0.1
    `*nintendo.com` -> 127.0.0.1
    `receive-lp1.er.srv.nintendo.net` -> 127.0.0.1
    `receive-lp1.dg.srv.nintendo.net` -> 127.0.0.1
Instructions for 90DNS
You can add a custom DNS to your Wi-Fi connection that will block all communication with Nintendo's servers. We will be using 90DNS, a community-run custom DNS server. If you prefer, you can run your own DNS server following the instructions on the GitLab repository.
Enter the console's System Settings, and then proceed to the Internet tab. From here you can choose one of the 3 methods of setting up 90DNS below, depending on what you currently have set up on your Switch.
Follow this section if you wish to set up 90DNS on a Wi-Fi network you haven't connected to before.
WARNING
Open Wi-Fi networks without a password
Not all Wi-Fi networks require a password to connect. If your network does not use one, you can use the Manual Setup option, located at the very bottom of the Internet Settings screen below all other Wi-Fi networks.
- Select your Wi-Fi network from the list of networks.
- Enter an incorrect password that is 8 characters long and press
OK. - After a few moments of attempting to connect, the console will display a connection error.
- Press
OKto close the error message. - Press
Closewhen it offers to display more details about the error. - When asked if you want to re-enter the password, pick
View Settings. - Change
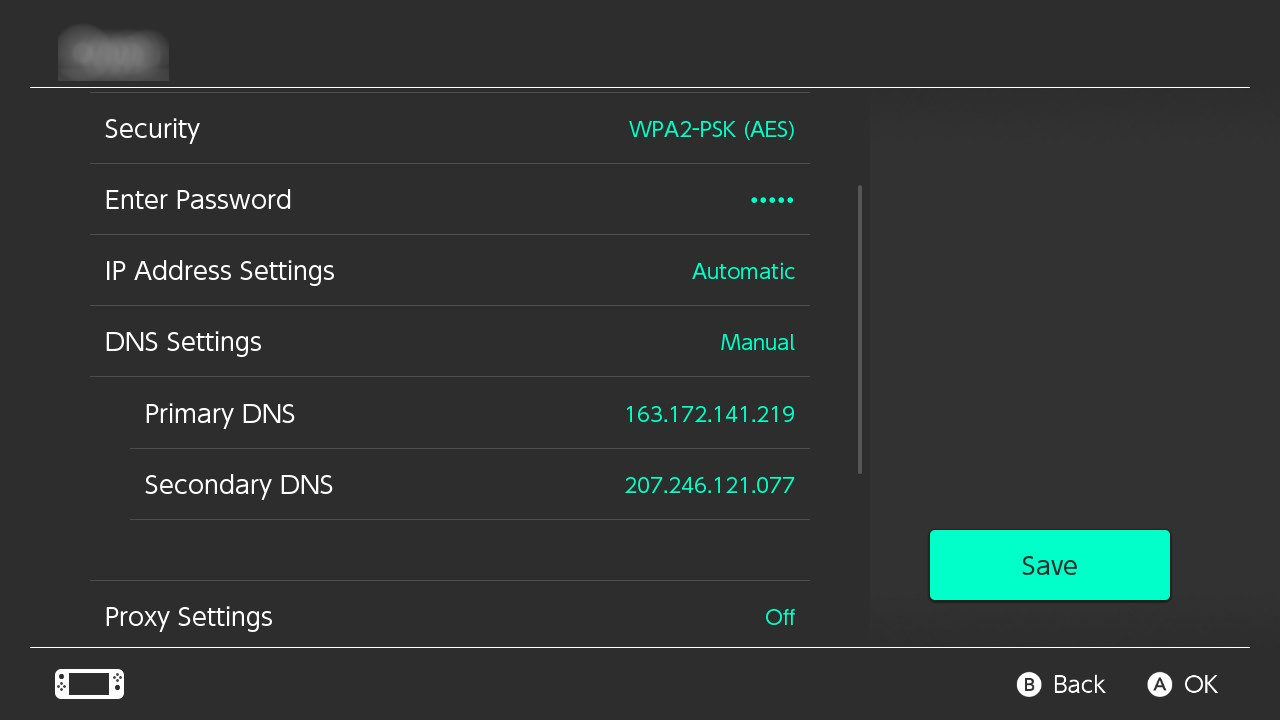
DNS SettingstoManual. - Pick the server that is the closest to your location out of the below chart and enter its
PrimaryandSecondaryDNS into your connection settings. - Enter the correct password for your Wi-Fi connection.
- Save the settings and test the connection.
| Location | Primary DNS | Secondary DNS |
|---|---|---|
| Europe (Server located in France) | 163.172.141.219 | 207.246.121.77 |
| America (Server located in the USA) | 207.246.121.77 | 163.172.141.219 |
TIP
Example for a 90DNS connection with the Europe settings:
Follow this section if you wish to edit an existing, saved Wi-Fi network.
- Select your existing Wi-Fi network from the list of networks.
- Select
Change Settings. - Pick the server that is the closest to your location out of the below chart and enter its Primary and Secondary DNS into your connection settings.
- Save the settings and test the connection.
| Location | Primary DNS | Secondary DNS |
|---|---|---|
| Europe (Server located in France) | 163.172.141.219 | 207.246.121.77 |
| America (Server located in the USA) | 207.246.121.77 | 163.172.141.219 |
TIP
Example for a 90DNS connection with the Europe settings:
Follow this section if you wish to use a homebrew app to configure 90DNS on all saved Wi-Fi networks.
- Download switch-90dns-setter and put it in the
/switchfolder. - Launch CFW and open the homebrew menu.
- Launch
90DNS Setter. - Press X to apply 90DNS to all Wi-Fi networks.
- Press Y to reboot the Switch.
- Check in System Settings to see if your networks have a custom DNS applied.
Testing if you can reach Nintendo
Testing via the eShop (Stock)
- Open the eShop. Wait until it either opens or displays an error.
- If it displays "Unable to display page.", you seem to have blocked Nintendo's servers.
Testing via a homebrew app (CFW)
- Download the latest release of the 90DNS Tester
- Place the
Switch_90DNS_tester.nroin theswitchfolder on your SD. - Enter the homebrew menu and run the 90DNS Tester.
- After the test finished it should look similar to the below picture, with every
nintendodomain being blocked.
TIP
