Keeping your system up-to-date
This page documents how you can keep your system up-to-date.
After following our guide, your system will consist of three core elements that can be updated. Atmosphère, hekate and your system firmware.
Updating Atmosphère
When updating Atmosphère, always make sure to read the release notes. They may list important changes and modifications to your system.
When a new version of Atmosphère releases, you can update Atmosphère by following these steps:
- Enter RCM and inject the hekate payload.
- If you use a modchipped Switch, you can simply just turn your Switch on with the hekate payload renamed to
payload.binon the root of your microSD card.
- If you use a modchipped Switch, you can simply just turn your Switch on with the hekate payload renamed to
- Navigate to
Tools>USB Tools>SD Cardand plug your Switch into your PC via USB. - Download the latest release of Atmosphère (Download the
atmosphere-(version)-master-(version)+hbl-(version)+hbmenu-(version).ziprelease of Atmosphère.) - Copy the contents of the Atmosphère
.zipfile to the root of your microSD card.- If you are prompted to overwrite files, do so.
- Eject the
UMSdevice safely from within your computer's operating system. - (If your hekate is not on the latest version) update hekate via the steps below.
Updating hekate
When updating hekate always make sure to read the release notes. They may list important changes and modifications to your system.
When a new version of hekate releases, you can update by following these steps:
- Enter RCM and inject the hekate payload.
- If you use a modchipped Switch, you can simply just turn your Switch on with the hekate payload renamed to
payload.binon the root of your microSD card.
- If you use a modchipped Switch, you can simply just turn your Switch on with the hekate payload renamed to
- Navigate to
Tools>USB Tools>SD Cardand plug your Switch into your PC via USB. - Download the latest version of hekate (Download the
hekate_ctcaer_(version).ziprelease of hekate). - Copy the
bootloaderfolder from the hekate.zipfile to the root of your microSD card. If you are asked to overwrite or merge files while copying, say yes to merge/overwrite them. - Eject the
UMSdevice safely from within your computer's operating system. - Go back to hekate's main menu and press
Reload>Reloadto reload hekate from your microSD card. - From here, you're done and you can boot into CFW and update your firmware. (See sections below.)
- Note: If your system does not boot as expected after updating, please consult the Common crashes after updating section below.
Updating your firmware
Always check before updating your system firmware if the latest version of Atmosphère as well as the latest version of hekate support the firmware version you are updating towards.
Section I - Updating your sysMMC's firmware
WARNING
Before continuing with this guide, make sure your sysMMC is up to date. If your sysMMC is not up-to-date, perform the steps in this section whether your Switch is modchipped or not.
DANGER
Note regarding updating towards major firmware versions
Updating your Switch firmware should be done via OFW or Stock on modchipped consoles when updating towards a major firmware version. The term "major" in Switch firmware version means that the first number in the firmware version number has changed. An example of a major firmware version update would be updating from 20.5.0 to 21.0.0, the first number is the major firmware version number. You may also want to do the same thing for minor firmware versions (for example, updating from 21.1.0 to 21.2.0).
The reason why updating via OFW/Stock is recommended on modchipped consoles is because it ensures that you properly burn your e-fuses and preserve the ability to boot OFW afterwards (in the situations where Atmosphere and/or hekate haven't been updated to support the firmware version you've updated to). In rare instances, it also prevents issues that can occur when updating via sysCFW (incomplete firmware updates, improperly updated BOOT0/BOOT1 partitions, etc).
Select the tab that best applies to your situation. Once you've successfully updated your firmware, continue with the rest of the guide below.
- Modchipped-console users: Boot hekate/Nyx, navigate to
Reboot>OFWfrom hekate'sHomemenu and then update throughSystem Settings>System>System Update.- Note: If you cannot boot
OFW, please bootStock sysMMCfrom hekate'sLaunchmenu instead.
- Note: If you cannot boot
- Unpatched/Non hardware modified-console users: Boot hekate/Nyx, navigate to
Launch>Atmosphere PKG3 sysMMC(may be called something different if you aren't using our guide's hekate configuration) and then update your firmware viaSystem Settings>System>System Update.- Note: If you have an unpatched Switch, have autoRCM enabled and you're updating your system while booted into Stock or OFW, updating will disable autoRCM and you will need to enter RCM manually to boot custom firmware again. To prevent autoRCM from being disabled, boot sysCFW and update through settings from there, as booting without AutoRCM will burn any preserved e-fuses.
Section II - Information about emuMMC
Your sysMMC and emuMMC have separate system firmware versions and need to be updated separately.
If you keep your emuMMC offline, you have 3 options:
- You can dump the currently installed firmware version from your sysMMC
- You can dump the firmware from another Switch you own
- You can use a gamecard to update your firmware (keep in mind that no gamecard contains the latest available firmware version at the time of writing)
Only the first option is covered in the steps below.
Section III - Updating emuMMC by dumping an updated firmware from your sysMMC
DANGER
Downgrading
This guide is made for updating your emuMMC's firmware. It is not for downgrading. Downgrading at all, sysMMC or emuMMC, is not supported, not recommended and not worth it. Downgrading is also very dangerous and can lead to serious complications even when performed correctly.
There are three supported methods of dumping your sysMMC's firmware, these methods are detailed in the tabs below. All choices will provide the same end result, but can be more difficult depending on the console model you have.
Requirements
- The latest release of Goldleaf (
Goldleaf.nro)
Section I - Preparing your microSD card
- Boot into hekate.
- Go to
Tools>USB Tools>SD Cardand connect your Switch to your PC via USB. - Download the latest release of
Goldleaf.nroand place it insd:/switchon your microSD card.
Section II - Dumping your sysMMC firmware
- Boot into hekate, and navigate to
Launch>Atmosphere PKG3 sysMMC.Atmosphere PKG3 sysMMCis sysCFW, this environment may be called something different if you do not use the config we provide in our guide.
- Once booted into sysCFW, open the homebrew menu in applet mode by opening the gallery applet on your home menu.
- Title takeover mode (holding
Rwhile launching any title on your HOME menu) also works, but isn't required for this process.
- Title takeover mode (holding
- Find Goldleaf in your homebrew menu and launch the app.
- Navigate to
Console & Goldleaf settings>Firmware and updates>Export update>Directory, then wait for Goldleaf to finish dumping your currently installed firmware version. - Once done, reboot back to hekate by holding power for 3-4 seconds and selecting
Power Options>Restart, or by using theReboot to Payloadhomebrew app in your homebrew menu (Erista ("V1") console users only).
Requirements
- The latest release of nxdumptool (
nxdt_rw_poc.nro)
Section I - Preparing your microSD card
- Boot into hekate.
- Go to
Tools>USB Tools>SD Cardand connect your Switch to your PC via USB. - Download the latest release of
nxdt_rw_poc.nroand place it insd:/switchon your microSD card.
Section II - Dumping your sysMMC firmware
- Boot into hekate, and navigate to
Launch>Atmosphere PKG3 sysMMC.Atmosphere PKG3 sysMMCis sysCFW, this environment may be called something different if you do not use the config we provide in our guide.
- Once booted into sysCFW, open the homebrew menu in applet mode by opening the gallery applet on your home menu.
- Title takeover mode (holding
Rwhile launching any title on your HOME menu) also works, but isn't required for this process.
- Title takeover mode (holding
- Find nxdumptool (
nxdt_rw_poc) in your homebrew menu and launch the app. - Navigate to
dump system update>start dump, then wait for nxdumptool to finish dumping your currently installed firmware version. - Once done, reboot back to hekate by holding power for 3-4 seconds and selecting
Power Options>Restart, or by using theReboot to Payloadhomebrew app in your homebrew menu (Erista ("V1") console users only).
Requirements
- The latest release of TegraExplorer (
TegraExplorer.bin)
WARNING
On Mariko ("V2") consoles, this method of dumping the sysMMC's firmware requires you to have dumped your console's prod.keys prior to starting the steps below. To do this, you will need Lockpick_RCM.
- We do not, under any circumstance, assist with the sourcing (locating) of the Lockpick_RCM payload, please refrain from asking about where to obtain it.
Section I - Preparing your microSD card
- Boot into hekate.
- Go to
Tools>USB Tools>SD Cardand connect your Switch to your PC via USB. - Download the latest release of
TegraExplorer.binand place itsd:/bootloader/payloadson your microSD card.
Section II - Dumping your sysMMC firmware
- Boot into hekate and navigate to
Payloads>TegraExplorer.bin. - Using the joystick and the A buttons, select the
FirmwareDump.tescript, then selectDump sysmmc.- If navigation doesn't work with your Joycons, navigating using the volume buttons and selecting using the power button also works. (This is also required for Switch Lite console users.)
- Wait approximately 1-2 minutes for the script to dump your firmware.
- It may take a little longer depending on the specifications of your microSD card.
- When the script finishes, press any button.
- Select
Reboot to bootloader/update.bin.
Updating your emuMMC's firmware with Daybreak
- In hekate go to
Launch>Atmosphere PKG3 emuMMC. - Once booted into your emuMMC, open the homebrew menu in applet mode by launching the gallery applet on your HOME menu.
- Title takeover mode (holding
Rwhile launching any title on your HOME menu) also works, but isn't required for this process.
- Title takeover mode (holding
- Find Daybreak in the homebrew menu and launch it.
- Tap on
Installand follow the instructions corresponding to the method you used to dump your firmware below.- For users who dumped their firmware using Goldleaf: Navigate to
sd:/switch/Goldleaf/export/update/<latest firmware version number>. - For users who dumped their firmware using nxdumptool: Navigate to
sd:/nxdt_rw_poc/System Update/<latest firmware version number>. - For users who dumped their firmware using TegraExplorer: Navigate to
sd:/tegraexplorer/Firmware/<latest firmware version number>.
- For users who dumped their firmware using Goldleaf: Navigate to
- Tap on
Continueand thenPreserve settings.- If you see the message
Warning: exFAT firmware is missing or corrupt, you likely don't have the exFAT drivers installed on your sysMMC. Just press continue if this is the case.
- If you see the message
- If it is available choose
Install (FAT32 + exFAT), otherwise selectInstall (FAT32)and thenContinue. - Wait until Daybreak completes installing the dumped firmware.
- Once it completes, it will ask if you want to reboot. Tap
Reboot. - Once rebooted, launch into emuMMC and verify your system works. You can verify your system has been properly updated in
System Settings>System, it will tell you the installed firmware version underneath theSystem Updatebutton.- Note: If your system does not boot as expected after updating, please consult the Common crashes after updating section below.
Common crashes after updating
After updating your firmware, you might run into crashes due to incompatible sysmodules. The following crashes are the most common ones, but is not an exhaustive list.
- Note: hekate and fusee are both bootloaders, these bootloaders have different ways of presenting error screens to the user. Errors displayed by hekate will typically be yellow and errors displayed by fusee will typically be white.
- Below you will find the way it's presented depending on how you normally boot into CFW.
Custom theme crash
TIP
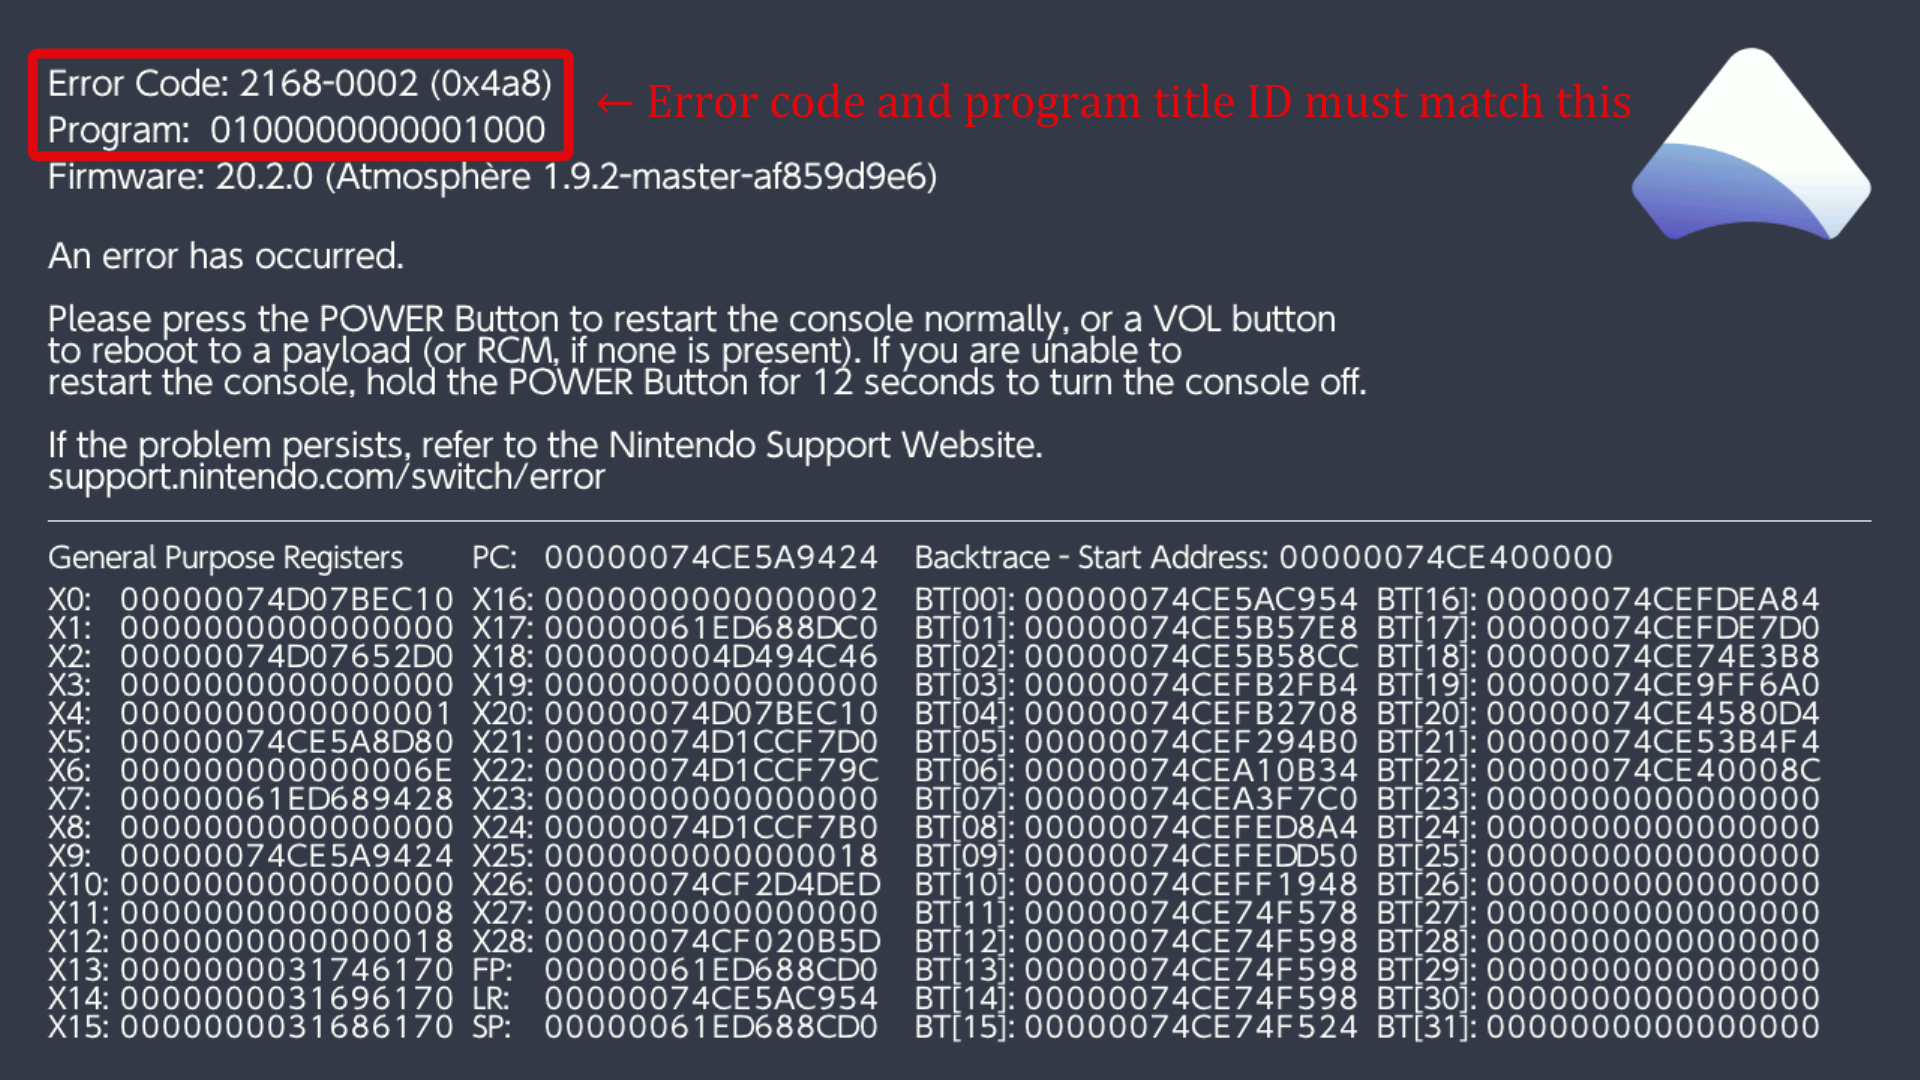
This crash typically happens due to the currently installed custom theme not being compatible with the HOME menu of your currently installed firmware version. In order to fix this crash, navigate to sd:/atmosphere/contents and delete the folder named 0100000000001000. You may reinstall your custom theme afterwards using the NXTheme Installer guide.
MissionControl crash


This happens due to your current version of MissionControl not being compatible with your currently installed Atmosphère version. If there is a newer version of MissionControl available for your currently installed Atmosphère version, you should update to that newer version if you wish to keep using MissionControl. If not, you can fix this crash by navigating to sd:/atmosphere/contents and deleting the folder named 010000000000bd00, which will uninstall MissionControl.
ldn_mitm crash


This happens due to your current version of ldn_mitm not being compatible with your currently installed Atmosphère version. If there is a newer version of ldn_mitm available for your currently installed Atmosphère version, you should update to that newer version if you wish to keep using ldn_mitm. If not, you can fix this crash by navigating to sd:/atmosphere/contents and deleting the folder named 4200000000000010, which will uninstall ldn_mitm.
Fully yellow/blue screen on boot
This usually happens due to mismatched Atmosphère files being installed (for example, due to an incomplete Atmosphère update). Even if you're sure you've updated Atmosphère, re-update to the latest available version.
'Unknown pkg1 version. HOS version not supported!'
If there is a line of white text saying Found pkg1 ('XXXXXXXXXXXXXX')., X being any number, this is most likely due to an incompatible version of hekate being installed. Even if you're sure you've updated hekate, re-update to the latest available version. The pkg1 ID is the ID of the installed firmware version, if the pkg1 field is empty or contains scrambled text, please ask for assistance in #switch-assistance-1 or #switch-assistance-2 in the NH Discord server.
Gamecards don't work after updating my firmware
Please unfold the Legacy information section at the bottom of this page and see if that resolves your issues.
Still running into issues?
If you still run into issues at this point, please ask for assistance in #switch-assistance-1 or #switch-assistance-2 in the NH Discord server
Legacy information
WARNING
Updating from below Atmosphère 1.0.0
If you update from below Atmosphère 1.0.0, there are additional steps to follow. You will have to delete the sept folder from your microSD, delete fusee-secondary.bin from your atmosphere folder and update your hekate config file: hekate_ipl.ini in the bootloader folder.
Gamecard reader firmware
In addition, updating to or past some system firmware versions will update your Switch's gamecard reader firmware. Refer to the table below for information about which firmware updates updated the firmware of the gamecard reader.
| Updating from | Updating towards | Updates gamecard firmware |
|---|---|---|
| Below 4.0.0 | Below 4.0.0 | No |
| Below 4.0.0 | 4.0.0 or above | Yes |
| On or above 4.0.0, but below 9.0.0 | At least 4.0.1 but below 9.0.0 | No |
| On or above 4.0.0, but below 9.0.0 | 9.0.0 or above | Yes |
| On or above 9.0.0, but below 11.0.0 | At least 9.0.1 but below 11.0.0 | No |
| On or above 9.0.0, but below 11.0.0 | 11.0.0 or above | Yes |
| On or above 11.0.0 but below 12.0.0 | At least 11.0.1 but below 12.0.0 | No |
| On or above 11.0.0 but below 12.0.0 | 12.0.0 or above | Yes |
| On or above 12.0.0 but below 14.0.0 | At least 12.0.1 but below 13.2.1 | No |
| On or above 12.0.0 but below 14.0.0 | 14.0.0 or above | Yes |
| On or above 14.0.0 | Latest supported Atmosphère & hekate revision | No |
If at least one of the versions you are updating towards also updates the gamecard reader's firmware, you will not be able to downgrade below that version without making the gamecard reader unusable until you update.
Atmosphère and hekate come bundled with patches that automatically disable the gamecard reader if it is detected that the system has an older gamecard reader firmware that would be updated. If you boot into RCM on each boot (for example by using AutoRCM), this means that the gamecard slot will not be updated and you can downgrade below that version. If this happens, you will not be able to use the gamecard slot as long as you are on the newer firmware.
Otherwise, you can safely update your system firmware through the system settings.